How to Make Your Own Explainer Video – Part 2 of 3
In this second installment, I’ll go over the next three steps of making your professional explainer video from home, DIY, spending very little money. These steps are:

- Storyboard & Illustration – I’ll show you exactly how I did mine from hand sketches to Adobe Illustrator, and offer free tools to do the job.
- Making the Video – I used Keynote. I’ll show you exactly how to do it and how to capture the screen using free software.
- Editing the Video – Here, you can use iMovie (if you’re on a Mac) to quickly get the video to synchronize with the audio.
Before I begin, once again, here’s the explainer video for my company, ZANKME.com
Storyboard
This is where you sketch every single ‘scene’ in your explainer video. You’ll need:
- Pen/pencil
- A few sheets of blank paper
- A copy of your finalized script


Illustration
I chose to avoid going with stock images for my explainer video, but that doesn’t mean that you can’t do that and be successful. If you want to try using stock images, surf around these sites to see if you find anything that you like:
You can buy ‘vector’ images from any of these sites, and you may just find a great collection that suits your needs. For this post, I’ll assume that you use these sites only for a great source of inspiration. Here’s what I recommend:
- Using the above sites, find a few dozen images you like. Sketch as you browse, getting a few ideas on paper of the types of characters or shapes or iconography you like.
- Colors are not important now. Try to think in black and white. Color will come later.
- Settle on the theme you want. I used a character, Ivan. For the rest of this article, I’ll assume you’re going with a character as well, but it’s not crucial.
Now that you have an idea of your character(s) and a storyboard to go by, it’s time to illustrate every frame you sketched in your storyboard. You can do this! Even stick figures can be very effective. Remember, you’re showcasing your product, not the fanciest illustration on the planet. Just take a look at T. Ferris’ explainer video where he uses cut-out figures in a very clever way. Very simple, and very effective.
Here’s a before and after shot of my ‘star’, Ivan. Oddly enough, I chose the first ‘Ivan’ I drew, but it rarely goes this way. After I had agreed on the stick figure, I filled him in using color. More on that later.

Fans: I knew Ivan needed a supporting cast, so I used the inspiration I had gained looking through stock photos and illustrations to draw up a few other characters. You can see the ones that I chose and finished.

Merch: These were especially simple. Again, the point of my video was not to have great drawings of merch, but rather to use simple drawings to help people better-understand my product.

Clipboard: This one was inspired by some various clip art I found somewhere while searching Google images. I had to draw another arm for Ivan to hold it up. Working off my storyboard, I knew I also needed a shot of Ivan considering his fans. I used the three fans from above for this.

Once you have finished all the black and white illustrations for your storyboard, it’s time to add color! Be careful here. Too many or the wrong colors can ruin an otherwise great presentation. For help choosing your colors, here are a few resources I used:
I love color-hex.com. Sart with a color you really like. Blue is my favorite color, so say “#33b2ff”. Enter that color at the top and click ‘Get color info’. Then scroll down until you see “Monochromatic Colors of #33b2ff”. These colors are great for adding depth and subtlety to a figure. The analogous colors are generally very pleasing to the eye and can give you options for coloring different parts of your illustrations. Use the triadic colors for accents, but sparingly, as the triadic colors tend to compete with one another. Complementary colors are similar, in that they provide a large color-contrast and while powerful, might best be used sparingly. Here is a quick article that gives a few more examples: http://www.tigercolor.com/color-lab/color-theory/color-harmonies.htm
Try to pick 3 or 4 colors to use that work well together without too much competition. Then add touches of the monochromatic variants. Make some color swatches in your favorite illustration program and stick to these for your whole project.
While we’re here, I should say somethings about fonts:
- Pick one and use it. You probably won’t need more than one. If you DO use two, be sure you know what you’re doing. Google (of course) can be of some help here. Here is a page showing ‘pairings’ that well with the terrific Open Sans font: http://www.google.com/webfonts/specimen/Open+Sans#pairings
- Use a little care when sizing your fonts. Using a 36 point font next to the same font in 35 point is probably not a good idea. Give them at least a two-point difference. Try using 14 with 16 or 18 for emphasis.
- Please, please no more Comic Sans!! 😉 (See this: http://sixrevisions.com/graphics-design/comic-sans-the-font-everyone-loves-to-hate/)
Making the Video:
For my explainer video, I used Keynote (on a Mac) for all the ‘animations’, but you could use MS Powerpoint, although having used both, I feel that Keynote is superior for this purpose. Here are the steps I used to complete the animations. Note that the Keynote file took me around five hours to create and when complete, contained 64 slides with animation between almost all of them.
You’ll be working off your storyboard here; you won’t need the voiceover just yet.
To get started, look at the first two frames of your storyboard; you’re going to use keynote to get them to transition together nicely. Let’s look at my first few frames and dive into the process.

The first frame is only Ivan. Pretty easy. From Illustrator, I imported Ivan and sized him the way I wanted. To make it more ‘interesting’, I gave him a left offset.
In the second frame, I wanted to emphasize that Ivan is a musician with a quick guitar riff. To accompany this, I wanted Ivan to zoom in quickly and make the ‘rocker’ hand gesture. Looking at frame two, I put Ivan in the middle of the screen, small. Then, in frame three, I zoomed in quickly (0.1s) using ‘Magic Move’ within Keynote. Magic Move animates from one slide to the next, as long as the same figure appears in both slides. Use command-d to duplicate your slide, then add Magic Move to the first slide and change your second slide as you desire. That’s it. That’s exactly how I got all the ‘merch’ to shrink and appear on top of the table in the next few frames. For objects that appear, I used a few ‘build in’ and ‘build out’ transitions from the ‘build inspector’. The best thing to do is preview all the transitions then go with a few that you like. I would avoid using all of them, and try to stick with something more consistent. Play around with these for a while. It’s really easy to get the hang of it. Who knows, it might even help you with your pitch deck 🙂
The last step is to ‘play’ your animations and record them with software that captures your screen. I used screen flow, but there are other options out there. Here are a couple:
- Camstudio (Free for PC)
- Quicktime Player (free for Mac)
Don’t’ worry about timing while you record your screen. My animation capture was much longer than my finished video. Just make sure you have captured each one of your animations. Save the video and let’s get editing.
Editing the Video:
In this step, the voiceover and the video you just captured are going to come together. I used Final Cut X, but you could do this in iMovie or any other basic video editing software that allows you to cut your video into small clips that you can move around and speed up or slow down.
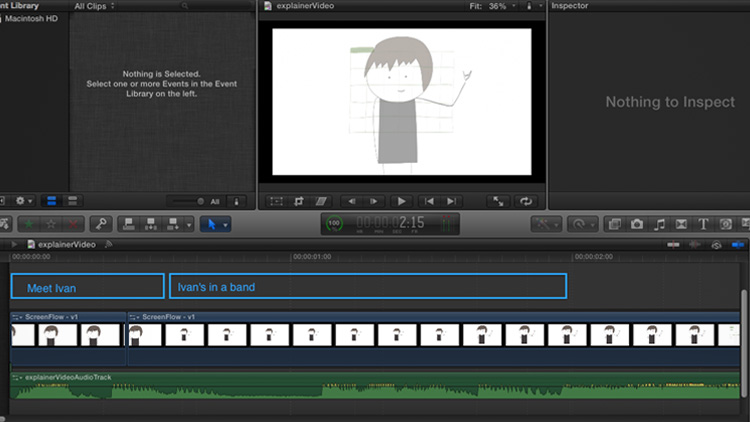
Using your video editor, import your finished voiceover and your screen capture. They won’t line up. Mine wasn’t even close, but that’s ok. Your job now is to cut the video to match the voiceover. In Final Cut, that means using the ‘blade’ tool to cut the video and move it around. I edited mine one section at a time, from the start. Here’s a screenshot of the beginning of the video. Notice the cut after the third frame. I made this cut before the transition to reduce the time that Ivan was shown so that the video would match the voiceover, but still retain the transition.

“Meet Ivan” – I had the static picture of Ivan. Easy, but I had to make sure he stayed on the screen only long enough to get me to the “Ivan’s in a band” line. As soon as that next line came, I needed the transition to start where he zooms in with his hand up. I used the blade tool to cut the clips as needed then I slowed down the first clip to fit the duration I needed. Immediately I transitioned to the rocker animation. The video worked perfectly with the voiceover so I moved to the next voiceover section, again, working to make the video match the voice. This is why I mentioned earlier that timing doesn’t matter when capturing the video.
Work through your whole video in this manner, cutting, elongating and shortening each clip until you have a video that matches up to your voiceover. Hopefully, if you’ve done all your animations correctly and followed your storyboard just right, you won’t have to go back to Keynote to make any changes.
Now you should have a good-looking video with a voiceover track explaining your product or service. Awesome. You’re almost there. In the next post, I’ll cover how to finish your explainer video, adding music and sound effects, then finally uploading your video to the web and sharing it with the world.
Thanks for following along. I hope this has been helpful.
Please leave any questions in the comments and I’ll get back to you.
Here’s PART 1
Here’s PART 3


[…] Here’s PART 2 […]
A multimedia story is some combination of video, text, still photos, audio, graphics and interactivity presented in a nonlinear format in which the information in each medium is complementary, not redundant. So your storyboard should be put together with all those elements in mind.